
A lot of people have emailed me asking for tips and techniques on how I create tilesets and graphics for my game, Golem, so I decided to write up a few articles about it. For the most part, I blundered through the learning process on my own, having only limited 'net access during the beginning stages. A lot of what I do could almost certainly be done better or more elegantly by someone with more skill and/or experience than I. What follows is by no means an expert's lesson, so take it and improve it and make me look like an unskilled hack.
For this tutorial, and all possible art content creation tutorials to follow, I will use the Gimp. Any articles which deal with 3D modelling will use Blender. I'm a firm believer in free and open source tools, being a hobbyist with little extra cash for spending on more expensive tools. These tools are more than sufficient for my needs. However, I am certain the same concepts can be applied whatever application you use.
First of all, Golem is an isometric game, meaning that it is viewed from an isometric perspective. Isometric projection is a special sort of orthographic projection, taking the form of a viewpoint elevated above the horizon by approx. 30 degrees, and rotated about the center by 45 degrees.
The game world is represented as a 2-dimensional map or grid of tiles, where each tile represents a fundamental unit of world space, and contains or potentially can contain a floor, two front-facing walls, and a roof, as well as assorted game objects and characters. Review information on tile-based and isometric games at GameDev.net if you are unfamiliar or unsure of these concepts, for what follows is a tutorial on making landscape and map graphics meant for tile-based games of this nature. Each tile, as I mentioned, has a roof, floor and walls. For the purpose of this article, the floor or ground tile is all we are concerned with right now. In a later article, I'll discuss the other aspects such as creation of walls, cliffs, and so forth.
In an isometric game, each portion of the floor is a diamond-shaped bitmap which, when tiled together with others as a whole, forms a representation of the ground. Our goal is to construct a set of tiles representing various terrains, like the pieces of a jigsaw puzzle which, when assembled, creates a visually pleasing whole. We need to ensure that the pieces, when fitted together, butt together seamlessly; that is, so that there are no ugly division lines between the pieces, to spoil the effect. The way I begin with a tileset is to choose the basic types of terrain I will use, based upon the overall theme of the level. Is it indoor or outdoor? Grassy plains or rocky desert? Sandy? Light or dark soil? With these thoughts in mind, I turn to my extensive library of digital photographs to select images of what I have in mind.
This library represents several hours of downloading stock photos off of the Internet, and many, many more hours of hiking around in the mountains and hills with camera in hand, taking shots of any texture, stone wall or cliff face, ground or dirt patch, or whatever that catches my eye. My personal collection measures in gigabytes, and grows pretty much every week. I recommend any budding young tile artist to do the same, gathering a collection of photos from which to draw. Odds are good, many of the photos you'll never use, but it's better to be overprepared than underprepared when inspiration strikes or when you need a particular effect. There are places on the 'net as well where high-resolution images can be downloaded. In particular, look for large, high-quality photos. However, you should be respectful and observe the rules of whatever sites you download from; high-res images can eat bandwidth alive, so you should try to stretch out your downloading sessions, and draw the bulk of your images from your own photography if possible.
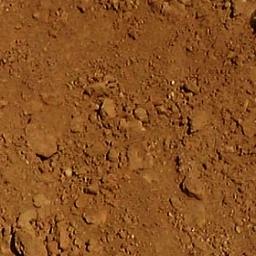
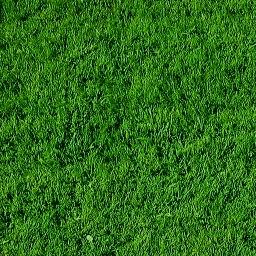
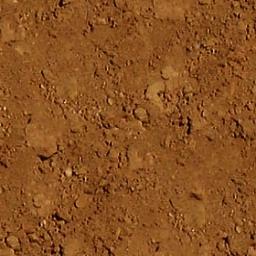
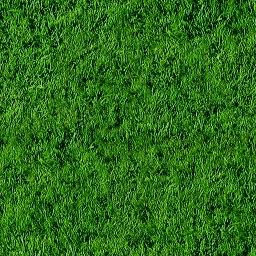
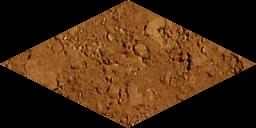
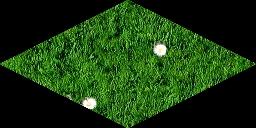
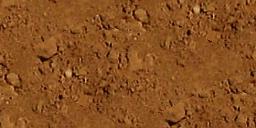
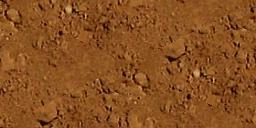
Browsing through my archive of photos, I select a couple that look and feel right, then open them up in the Gimp. Usually, the photos are far too large and varied for my purposes, so I will snip a piece from the photo that looks interesting, and use it as the basis for my tiles. For this discussion, I have chosen to create a grass and dirt tileset, so I have chosen two images, one of grass and one of dirt, and snipped them to 256x256 pixels using Image->Resize Canvas to crop out the unneeded portions. These are the source images I have chosen for this article, taken directly from photographs (of my back yard, incidentally, if I remember correctly):


Now, with these images in hand, begin playing with various techniques to edit the appearance of the textures to suit the image in your head of what they should look like. Many times, what seems to be lush and colorful in real-life actually tends to appear washed out and dull when you attempt to use it as-is in a game tile, so typically you will want to spend some time here trying various things to modify the coloration of the images. For example, the grass looks a little washed out, so we will spice it up a bit with more brilliant green coloration.
Load the grass image into the Gimp (or your image editor of choice), then create a new layer on top of the background. On the Layers, Channels and Paths dialog, select the new layer and set the Mode to Overlay. Then, select the Flood Fill tool and fill the new layer with a shade of green, trying several different variations until you find one you like. Overlaying the grass background with a green flood-fill will enhance the lush appearance of the grass without losing all of our wonderful detail. When you find an appearance you like, go ahead and flatten the layer to apply the changes. Remember to save often so that you can go back in case you make a mistake.
At this point, I frequently will export a sample of the image to a Golem tile, so that I can load it into the game and see how it looks. If I need to make adjustments, I do so. Here is the result, overlaying a deep brownish red shade for the dirt and a fairly bright green for the grass:
As you can see, I've livened up the green of the grass and deepened the brown of the dirt. The desired appearance should fit the theme and mood of a level. In Golem, I like bright and vibrant colors and an almost cartoony appearance for the landscape graphics. For other games, you might instead desire to mute the colors, dampen things down a bit to accentuate the objects in the world rather than the background. It's a choice that must be made per-game and even per-level. At this point, I like to create a quick throwaway composite of the two terrain types, to see how they are going to appear together as tiles.
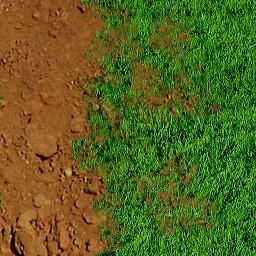
First, create a new image, then copy the dirt texture in and flatten it. Then copy in the grass texture as a new layer on top. Finally, use the erase tool to erase portions of the top grass layer, to reveal the dirt layer beneath. The Gimp provides a number of random-scattering type brushes, and it is possible also to create your own brushes, to give rough, speckled erase patterns and sort of randomize things a bit, rather than the smooth erasure patterns that standard round brushes give. Use 'em for more interesting results. This test composite image will give you a good idea of what the terrain types will look like next to each other, and help you to decide whether you need to go back and edit the colors some more. Do so as needed until you get a good appearance. It might take several tries, or it might not. It all depends--on luck, usually. Here is the composite test I made for our grass and dirt:
Once you have textures you can live with, it is time to make them seamless. The Gimp provides a filter in the Filter->Map menu called Make Seamless that can make a tile seamless algorithmically, but I almost never use it. I prefer to do the seamless editing by hand, so that I can do some other simple editing tasks to improve the overall appearance of the texture at the same time. My method of making a texture seamless is very similar to how I created the composite above.
First, go to the Layers, Channels and Paths dialog and right click on the background layer. In the menu, select Duplicate Layer to make a copy of the layer. Then, select the new layer (if not already selected), right click on the image and go to Image->Transforms->Offset. A dialog will pop-up asking how much to offset the image by. A handy-dandy button is provided to offset the image by 1/2 in each dimension. Click it (or enter half the image dimensions in the boxes by hand), then click OK, and the duplicate layer of your texture will now be offset, showing the visible seams that would occur at the edges.
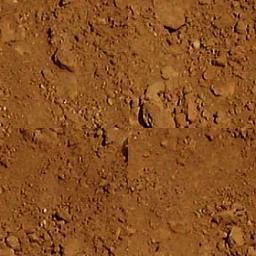
Once you have offset your top layer, select the Erase tool and a brush (round, soft-edge ones work well) and proceed to selectively erase the seams on the top layer, to reveal the un-offset layer beneath. Now is also a good time to try to erase out any obvious, contrasting bright or dark spots within the texture, and try to even out the overall brightness of the texture as best you can. Also, try to eliminate any obvious outstanding features that will aggravate the repetitive appearance when the texture is tiled. This process can take some few tries to get it to look right. I will usually periodically export a tile to load in the game and check the appearance, and pinpoint features that look bad. It's a trial-and-error process. On a noisy texture such as the grass, it may be difficult to make out the seams, so it may not be strictly necessary to perform the make-seamless step on such textures, but I do it anyway as you never really know when a seam might pop-up in the game and look like total ass. Here are the seamless textures:
Typically, I will expand this process to include snips from various portions of a high-res image, and construct a set with several variations, which can be randomly selected by the map builder to decrease the tiled appearance that occurs when one tile is repeated over and over. Try to choose all of your texture snips from the same image, or from images that are very similar, to ensure that the appearance between tiles does not vary too greatly. To ensure that all textures of a type will tile together correctly, select one of the tiles to act as a sort of base. Copy this texture and paste it on top of one of the other tiles, then use the erase tool to remove the center portions of the pasted tile, revealing the center portions of the bottom tile. Do not erase the edges. This results in tiles that have different centers but the same edges, ensuring that they can tile seamlessly together. Be careful to choose a tile with edges that are fairly non-descript; ie, that they have few distinguishing features that will show up and look bad when repeated. It may take a little work and patience, but it is necessary to avoid the evil repetition that critics will love to point out to you. (Trust me on this; they will point it out.)
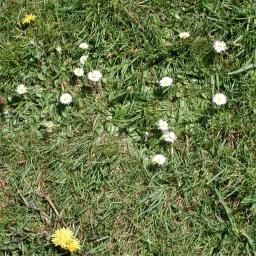
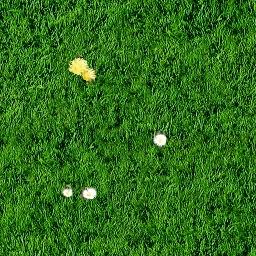
We now have a couple sets of tiling textures, but they're a little boring, don't you think? It's just grass and dirt; no small stones, no flowers in the grass, no mushrooms, nothing. So, let's add a little bit of detail to some of these tiles. This is a process I will perform to expand the variations accessible to the map builder, to further decrease the tiled appearance and give interesting visual variety. First, I need to delve again into my vast archive of photographs for some interesting details. In the case of the grass, I am looking mainly for flowers and such. If you have a digital camera, take it out into the fields and take some snapshots of wildflowers, flower beds, dandelions in the front yard, etc... Again, try to fit these details into the theme of your tileset. Is it meant to be a badlands set? Then use lots of photos of bones and skulls, withered plants, dead leaves, etc... choose the details to fit the mood. But for this bright, lush grass tileset, flowers it is. Find a good flowery field or individual flower you like, and crop it out, something like this:
Now, this is where a handy little tool called the Clone tool, or rubber stamp, comes in handy. If you don't know how the Clone tool works, I recommend you try it out. Basically, you select the tool (it's the icon that looks like a little rubber stamp), then hold CTRL and left click on a portion of an image (it doesn't have to be the image you are currently working on; it can be any image loaded by the Gimp) to set the clone source. Thereafter, you can paint on another image or layer using standard brushes and the Clone tool, and pixel data will be copied over from the source image. This tool comes in handy for laying down details in textures like this. Select the clone tool, hold CTRL and left click on a flower in the field, then choose a brush from the palette (a small, hard-edged brush, to avoid blurring in too much of the image surrounding the flower), and "paint" the flower into the grass texture. This same technique can be used to add in rocks, various types of fungi, bones, sticks... you name it. I also like to create various hybrid grass/dirt tiles for fringe locations and the like, by cloning in portions of my dirt tile. Use your imagination, and have fun.
Clone can also be used as an alternative means to all of the copying and pasting involved in the above method for making things seamless. Rather than duplicating a layer, then offsetting the top, you can instead offset the base background and set a Clone source from another image or texture of the same coloration, to sketch in dirt and details in place of the seam. I personally prefer the duplicate/erase method, but mostly because I'm in the habit of picking my stylus up off the tablet frequently, which has the effect of resetting the clone source to the location you placed it, and thus can repeat details if you are not careful. It's all a matter of personal preference.
Okay, now that we have a good set of tiles for both dirt and grass, the time has come to deal with the transitions. Transitions are the tiles in the map where dirt fades into grass and vice versa. In a traditional tile-based game (ie, without all the fancy alpha blending tricks brought by 3D acceleration) tile transitions are created as individual, separate tiles. The artist must create a comprehensive set of tiles to cover all possible patterns of dirt bordering grass, to ensure that terrains blend smoothly into one another without gaps or oddities.
To start on creating the transitions, create a new image and copy in the dirt texture. Flatten the image, then create a new layer. Copy the grass tile into this new layer. Now that we have dirt on one layer and grass on another, we are going to use what is called a Layer Mask. Right click on the top grass layer in the Layers, Channels and Paths dialog, and select Add Layer mask from the menu. This will create a mask for the layer, rather like an alpha channel. Where the mask is full white, the grass layer will be fully revealed. Where it is full black, the bottom dirt layer will be revealed. A layer mask can be painted into using shades of grey to create blending regions between the two tiles. On the Layers, Channels and Paths dialog, left click on the thumbnail of the layer mask, which should appear next to the colormap thumbnail of the layer it is to be applied to, in order to select the mask for editing. Then use standard brushes and pen tools, with shades of grey, to paint into the mask. Wherever you paint black, the bottom layer will be revealed. Paint in a good, ragged transition from black to white. To save time in future tileset construction, I usually construct sets of alpha mask greyscale images to use as layer masks, and save the images to file. Load the greyscale image, copy it into the layer mask, and voila. A nice, pretty transition texture in an instant. Here is a sample alpha mask and resultant transition tile:
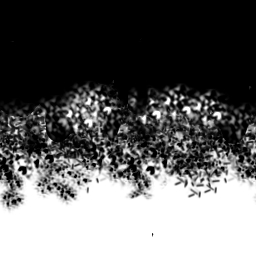
![]()
Again, for these transitions I will typically create a few alternatives so there are choices for the map builder to eliminate some of the repetition. As far as the number of transitions you need to create, I have determined 2 main cases. In the first case, any tile in the map can be either dirt or grass, without constraint. In this situation, there are 46 different possible terrain blending patterns, to handle all of the cases of adjacency patterns. (You can either trust me on this, or sit down with a piece of graph paper and sketch them all out; you probably will have to anyway, to get a good idea of what you are up against. Transition handling may be a topic for a future article.)
However, if you limit terrain placement so that a given terrain type, such as grass, covers terrain in blocks of 2x2 tiles, rather than allowing isolated grass tiles on just one tile or so, then you can eliminate a lot of the possibilities, such as the various T-intersections, elbows, and so forth. Each tile of grass is guaranteed to have at least 3 other grass tiles adjacent to it (the other three tiles in the 2x2 block owning the tile), so you can reduce the number of transitional tiles needed from 46 to 12. This is the method Golem uses, in order to reduce the memory consumption of a tileset.
As you can guess, 12 transition tiles is a lot less work than doing a full set of 46, and the memory savings are significant as well. If you want to reduce your memory usage for tilesets even further, you can steal a few tricks from the 3D realm and use alpha blending to generate blendings on the fly. In this method, a base terrain texture is lain down, then additional textures are combined with alpha masks and rendered on top of the base to generate the blendings. With this method, it is entirely possible to layer multiple terrain types to generate transitions between 2, 3 or more terrain types--something that would require a phenomenal number of hand-build transitions. But that is a tutorial for another day. This one is already getting longer than I'd expected, and I haven't even covered isometric tiles yet.
And speaking of isometric tiles, what do you say we take a whack at them? For the most part, the techniques for doing diamond tiles are identical to what I have already shown. The steps are the same: choosing the textures, editing for color, making seamless and eliminating obvious blemishes, adding detail, and creating transitions. But due to the non-rectangular shape of the tiles, some steps must be performed a little differently. So, let's go ahead and start with the rectangular dirt and grass textures we have already created. The first thing we need to do is snip out our diamond. A typical isometric tile is twice as wide as it is high. We are shooting for a diamond, then, that is 256x128 pixels in size. For this purpose, I maintain a mask image for the sole purpose of using the mask to select the area of the diamond tile. These are the masks I typically use, one for 256x128 tiles and the other for 128x64 tiles.


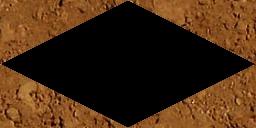
Start with the diamond tile mask as the background layer (or a duplicate of it, to avoid accidentally saving over the mask file). Then, copy a terrain texture into a new layer on top of the mask background. Now, you can select the white area on the background layer to select the tile area, then switch to the top texture layer to edit. Floodfill the areas outside the diamond with black to isolate the diamond tile, and there it is.
Since we already did coloring and detail, I'll focus here mainly on making an isometric tile seamless. Remember that with a standard rectangular tile, it was as simple as creating a duplicate layer and applying an offset to the new layer, then doing some creative erasing. Well, the trick for isometric tiles is similar, but we need to do a little preliminary work first.
To start with, select the white area on the diamond mask layer, then switch to the texture layer. Copy the selected texture area to the clipboard with CTRL_C. Now, apply an offset (Image->Transform->Offset) of 1/2 the image dimensions in both X and Y (again, Gimp provides a convenient button for this).
Now, paste the copied diamond tile back in and anchor it. Basically, this tiles the texture with itself, and gives us a seam to work with.
It's a little hard to notice in this texture, but if you look carefully you can see the seams. Now, duplicate this offset layer again into yet another new layer, and apply the offset filter again to this new layer. However, this time only apply the filter by 1/2 the image size in the Y direction. This will put the nexus of the seams in the center of the diamond.
Again, use the erase tool to selectively erase the seams, revealing the non-offset layer beneath. Once you have erased the seams (you may want to select the white mask diamond to easily see where the edges of the tile will be; be careful at the edges to no erase too much, or you will have to repeat the procedure to eliminate artifacts introduce by erasing at the edges), merge the top layer down into the second layer, and again select the white diamond on the background layer, invert, and floodfill to isolate the tile again. And now you have a seamlessly tiling isometric tile. You might want to create a test composite of the image tiled a few times to see how well it works.

In this case, there are a couple features about this dirt tile that bother me, but I'll leave them in for illustrative purposes. First and most obvious is the bright little white rock that you can see repeated three times in the above composite. That is the sort of thing I would take a few iterations of offset/erase to try and eliminate, or even better, use the clone tool to sketch in dirt from another portion of the base dirt tile. There are a couple other features I would eliminate as well, other rocks that stand out, some faint coloration issues that reveal the tile outlines, etc... I can usually eliminate most of these with a few repetitions of the procedure, but every now and then I get one that is easier to toss out and start from scratch than to eliminate all the wierd little doohickeys. Don't ever be afraid to just chuck it all in the trash and start again.
Transitions for diamond tiles are done exactly the same as rectangular tiles, except of course for following the edges of the diamond for transition boundaries rather than the edges of the image rectangle.
![]()
That's really about it for this article. It's a pretty simple method, really, with a lot of room for creativity (and improvement, certainly). The Gimp provides a lot of various tricks and capabilities for editing images that you should experiment with in your own work, as they can be used to achieve some very cool effects. Most importantly, you should practice making your own tiles. It is not difficult to achieve a nice, detailed tile; it just takes a little patience. In no time at all, you'll be doing tiles to put mine to shame; if you do, I would love to see some screenshots, so send me a link to your work. If you have any questions, comments or criticisms, or just want to show off better work than I could ever hope to do, email me at vertexnormal@linuxmail.org.
Josh Tippetts Copyright 2004 Joshua Tippetts
